If you are not seeing your network adapter on your computer, one of the reasons for this may be because you have an older network card driver installed on your computer. But, you don’t have to worry, fixes are available to solve this problem. If the problem is happening on your computer for the first time, try rebooting your computer and check if you can discover the network adapter on your computer.
NOTE-
If you have an Ethernet cable plugged into your system, then you should unplug the Ethernet cable from your computer and then plug in the Ethernet cable again. Check if you can find the adapter on your computer.
If the network driver is still not appearing on your computer, go for the fixes.
Table of Contents
Fix 1- Perform cleanup of network devices-
Performing a clean up of the network devices will work out for you.
1. Pressing ‘Windows key‘ and the ‘R‘ key will open the Run window.
2. In the Run window, type “cmd” and then press ‘Ctrl+Shift+Enter‘ keys together to open the Command Prompt in administrative mode.
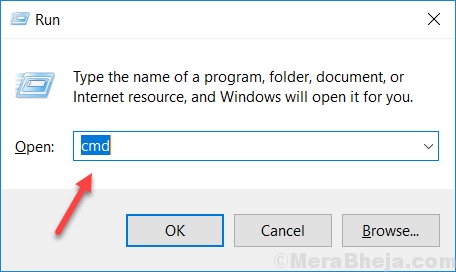
2. In the Command Prompt window, type or copy–paste this command and then press the Enter key.
netcfg -d

Close Command Prompt window.
[NOTE–
In case if you face any error when you are trying to execute the command, try executing the command again on your computer.
Restart your computer to let the changes take effect on your computer. Your problem should be solved.
Fix 2 – Reset Winsock from cmd
If any of the above fixes didn’t work out for you, resetting the winsock may help you out.
1. Open the Command Prompt with administrative rights.

2. In the Command Prompt window, type or copy–paste this command in Command Prompt window and hit Enter.
netsh winsock reset
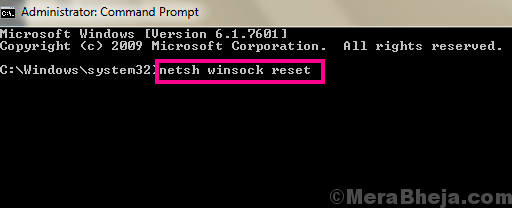
Close Command Prompt window on your computer.
Reboot your computer to save the changes. After rebooting check if you can discover the missing network adapter again on your computer.
Fix 3 – Show hidden devices in Device Manager
Sometimes the network adapter gets hidden in the Device Manager window and then this problem prevails. To check, follow these steps-
1. To open a Run window, just press ‘Windows key+R‘.
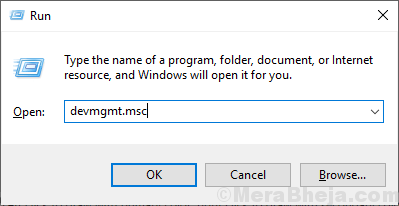
2. After you have opened the Run window, you have to type “devmgmt.msc“.
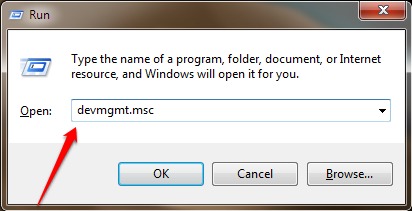
2. In the Device Manager window, click on “View” on the menu bar and then make sure “Show hidden devices” is checked.
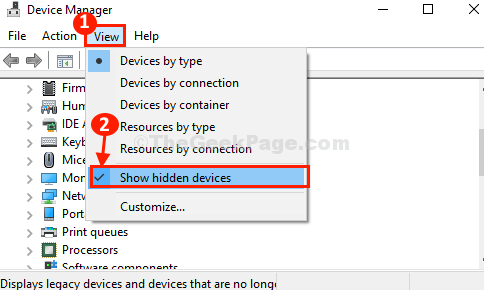
3. After doing that, click on “Network adapters” from the list of devices.
4. Then, click on “Action” in the menu bar and then finally click on “Scan for hardware changes“.
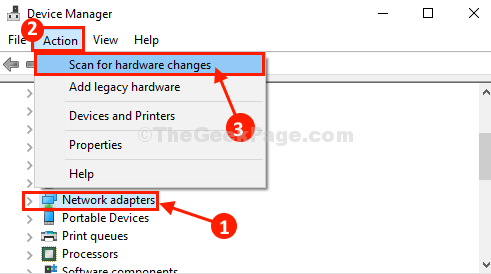
5. In Device Manager window, expand “Network adapters” sections and then check if the missing network adapter is appearing on your computer or not.
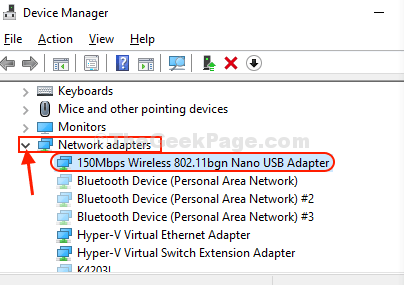
If this didn’t help you out, go for the next solution.
Fix 4 – Check power management settings
1. To open a Run window, just press ‘Windows key+R‘.
2. After you have opened the Run window, you have to type “devmgmt.msc“.

3. Now, double click on Network adapters from the list to expand it.
4. Right click on your network adapter and click on properties.
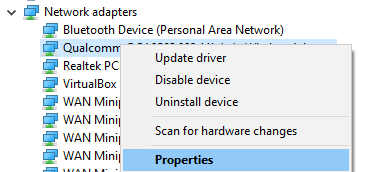
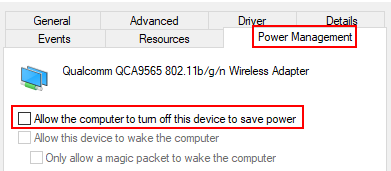
5. Now, Click on Power management Tab.
6. Uncheck Allow the Computer allow the computer to turn off this device option
Fix 5 – Automate WWAN AutoConfig
Automating the WWAN AutoConfig service on your computer will surely help you out.
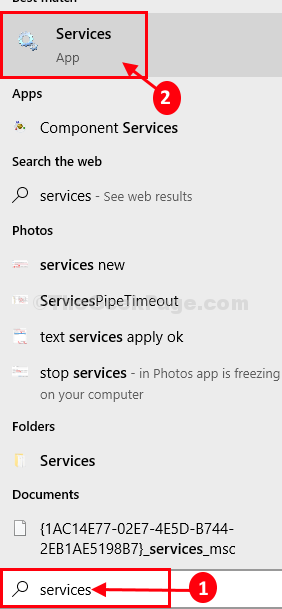
1. You will need to press Windows key+S and begin to type “Services“.
2. Then, click on the “Services” in the search result.
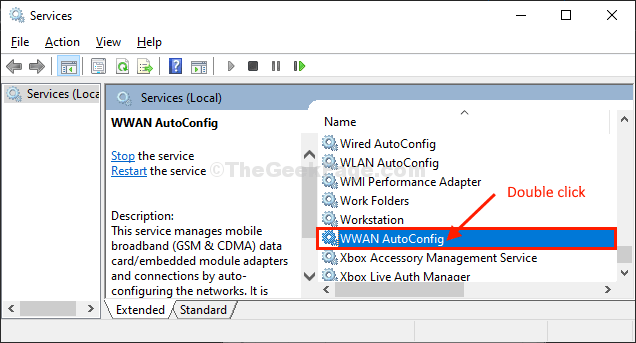
3. In the Services window, scroll down to find the “WWAN AutoConfig” service.
4. Now, double click on it, and WWAN AutoConfig Properties window will be opened.
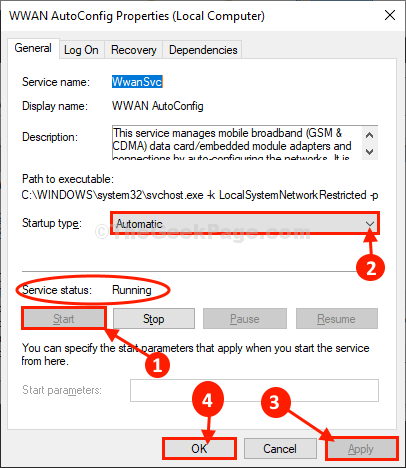
5. In WWAN AutoConfig Properties window, check the ‘Service status‘, if it is “Running“. In case, if it is ‘Stopped‘, simply click on “Start” to start the service.
6. Then, click on the drop-down menu beside the option”Startup type:” and select “Automatic“.
5. Finally, click on “Apply” and then on “OK” to save the changes on your computer.
Close Services window.
Reboot your computer.
After rebooting your computer check if you can discover the missing adapter on your computer.
Fix 6 – Update the network adapter driver
If you can not discover a network adapter driver on your computer, it is maybe because the old/incompatible version of the network adapter is installed. Updating your existing driver may solve the problem. Follow these steps to update your network adapter driver-
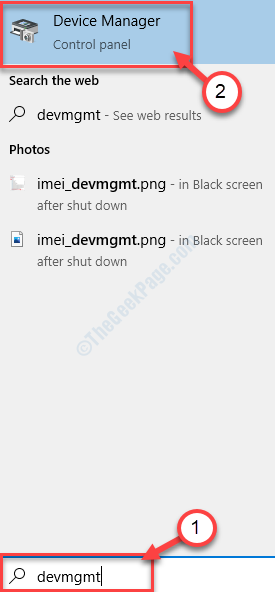
1. At first, press the Windows key and then start to type “devmgmt“.
2. Then, click on the “Device Manager” which appears in the elevated search result.
3. In the Device Manager window, find “Network Adapters” from the list, click on it to expand it.
4. Now, from the drop-down select the driver which you are using. Right-click on it and click on “Update driver”.

5. When you see this prompt has appeared “How do you want to search for the drivers?“.
6. At first, you have click on the option “Search automatically for updated driver software“.
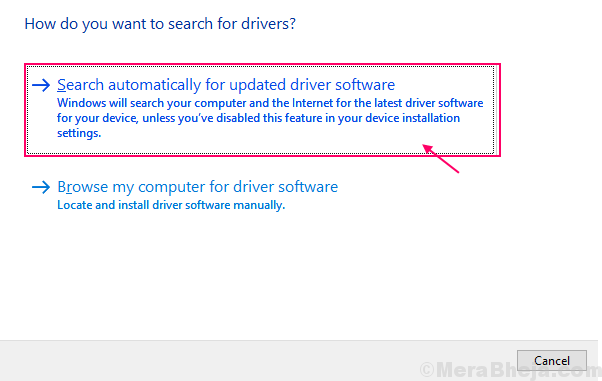
Wait till Windows searches for the compatible driver for your network adapter, downloads it and installs it. Close the Device Manager window.
Then, reboot your computer.
Check if you can find the network adapter driver. If the problems still persist then go for the next fix.
Fix 7 – Rollback network adapter driver update
If the network adapter was working well some days before then, recent updates to your driver may be the reason you are not seeing the network adapter on your computer. Rolling back the last update of your network adapter driver can solve the problem you are facing.
Follow these steps to rollback the faulty update of your network adapter driver–
1. At first, right-click on the Windows icon on the left-most corner of your screen, and then click on “Device Manager“.
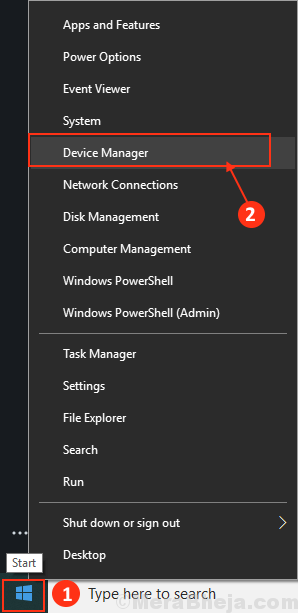
The Device Manager utility will open.
2. In the Device Manager window, find “Network Adapters” from the list, click on it to expand it.
3. Now, from the drop-down double click on the driver which you are currently using.
The properties window will open.

4. In the Properties window, go to the “Driver” tab.
5. Click on “Roll Back Driver“. Click on “OK“.
The driver will be rollbacked.
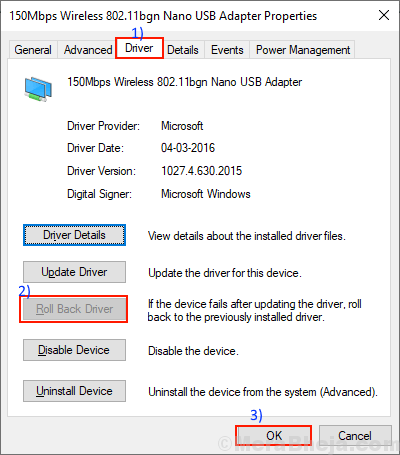
6. Close the Device Manager window.
Restart your computer.
After rebooting your computer check if any network adapter is visible on your computer. If you are still having the same problem go for the next fix.
Fix 8 – Uninstall and Reinstalling Network adapter
Uninstalling and reinstalling the network adapter can clear any corrupt or bad files of the network driver from your computer. Now, in the first step the uninstallation of the network adapter will be done, and in the next step we will install the network adapter.
Follow these steps to uninstall your network adapter driver-
1. Open the Device Manager window.
2. In the Device Manager utility window, expand the “Network Adapter” section.
3. Right-click on the network adapter you are using, click on “Uninstall device“. This will uninstall the driver.
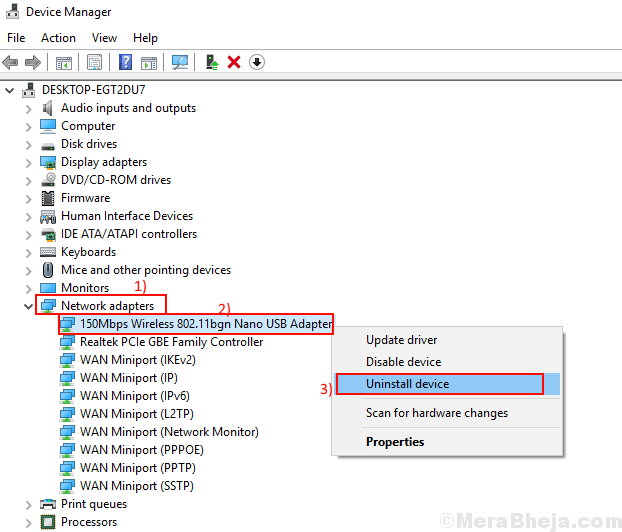
Now, we will reinstall the wifi driver again on your device.
Method 1–
Simply restarting your computer should reinstall the software again.
Method 2–
If rebooting your computer didn’t install the driver then you have to install the driver yourself. Follow to install the driver manually-
1. Open the Device Manager window.
2. At first, In the Device Manager window, click on “Action“.
3. Then, you need to click on “Scan for hardware changes“.
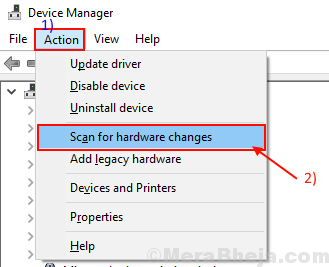
The uninstalled driver should be reinstalled again.
Method 3-
If Method 2 did not install the driver then follow this next steps –
1. Click on “View” of the Device Manager. Then click on “Show hidden device“.
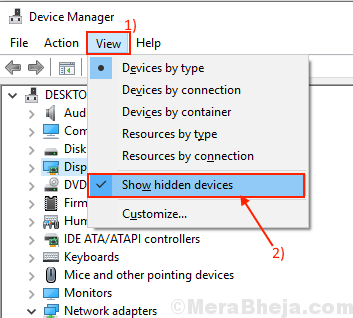
2. This will show the hidden drivers. Look out for your network adapter.
That network driver that you have uninstalled should bear a yellow triangle with the driver’s name.
3. Right-click on the network adapter driver and click on the “Update driver software“.

3. Simply, choose the option “Search automatically for updated driver software“.

You will need to wait patiently as Windows will install the compatible driver.
You will need to close the Device Manager window.
Restart your computer to save the changes.
After rebooting, check if you can find the network adapter on your computer.
Fix 9 – Run System Restore on your computer
Running a system restore from a system restore point can solve your problem.
1. Press Windows Key+R together. The Run window shall prevail.
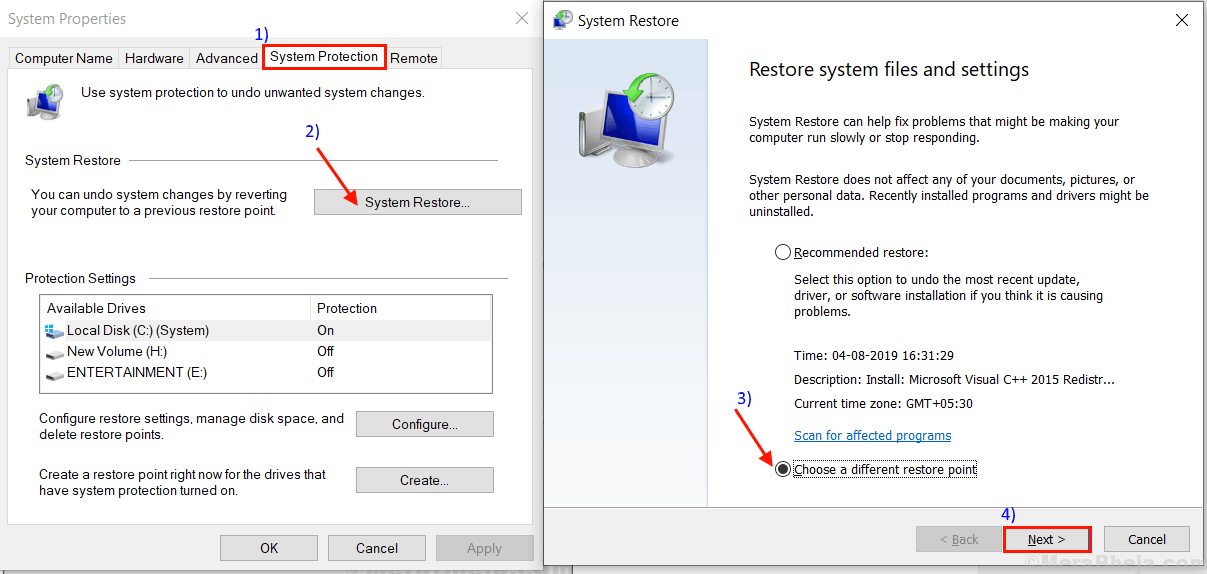
2. In the Run window, type “sysdm.cpl” and click on “OK“.
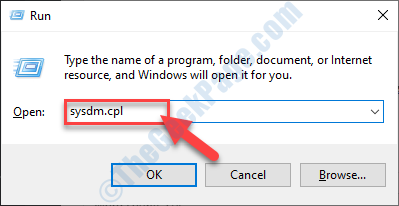
2. Go to the “System Protection” tab.
3. After click on “System Restore“. Then click on “Choose a different restore point“.
4. Then, you have to click on “Next“.
5. Choose the latest restore point
6. Then, click on the “Next“.

7. Finally, click on “Finish” to finish the process.

After the restoring process completes, check if you can find your network adapter.
If you still can’t find the network adapter then go for the next fix.
Fix 10 – Troubleshoot network problems
You can troubleshoot your problem with Windows troubleshooter. The troubleshooter will not only detect the problem of your network adapter will also attempt fixes for those problems. Follow these steps to troubleshoot your network adapter driver problem-
1. Type “troubleshoot network” in the search box beside the Windows icon and click on “Troubleshoot network“.

2. Now, click on “Network troubleshooter“.

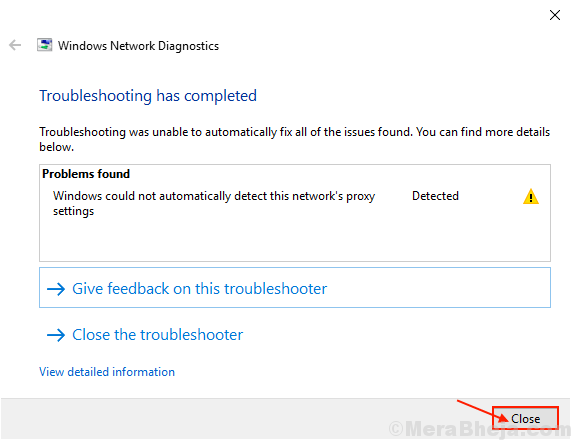
3. Now, follow on-screen instructions and it will automatically attempt fixes to your problem. When the process is complete click on “Close“.
Reboot your computer and check if you can find your network adapter driver on your computer. Your problem should be solved.